Tuesday, November 23, 2010

Homemade Advent Calendar

I have to say we are embarking on one of my most favorite holidays.......Christmas.

Since I've been married we have had the most fun with our advent calendar. I really can't remember having one as a child. The last three years seeing Courtney wake up in the morning to open one of the perforated windows on the calendar makes me excited for some reason. But I do have to say our advent calendar has taken a beating the last couple years.
So I thought to myself.... I have all this time on my hands. Why not make a homemade advent calendar that Courtney, Kat and Christina (the little joy in the oven) could last us for years and years to come and any other children we might have in the future.


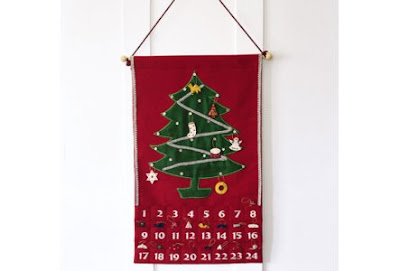
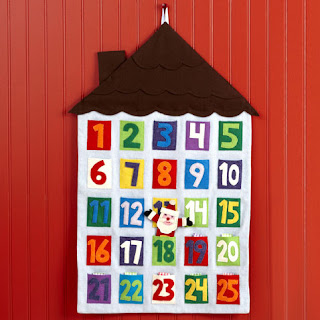
I started looking online because I was not sure how I should start my calendar. I came across these images and pulled bits and pieces from each.

(Pottery Barn Kids)


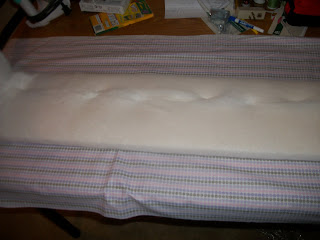
This is what I've gotten done so far


I have to say the worst part is over. Which was embroidering all those numbers on to the pockets. This calendar is going to be a combination candy and decorating. In no particular order half of the pockets will have some candy and the rest of the pockets will have little felt decorations to decorate the tree on top on the calendar. That's what the buttons are for on the tree.


I still have to attach the tree and pockets to the main part of the fabric and under each pocket their will be a bible reading to meditate on for the day. I am hoping to get all of this done over the Thanksgiving break. Between the long car ride and the all of the children to play with at my sister in-laws, I won't have to worry about the kids getting in the way. LOL


I am not the best at decorative stitching but I'm pretty sure after this project I'll be ready to go pro.


I will post the final picture before the 1st of December (hopefully).


Monday, November 22, 2010

Ribbon Board


When I was in Target the other day I saw the prettiest cork picture board to go into the girls room. But they wanted $25 for it (they have to be out of their minds) I will die before I spend $25 on a cork board. My genius child Courtney came up with a suggestion "Mommy, why not make one yourself?"

And so I did. I knew I had some old pictures in the basement that I was not doing anything with. So I used that for the frame and the base of the picture.


Here's what you'll need to make your own:

  • Lg enough piece of fabric to cover the frame back piece (8x10 etc..., I used an old skirt for fabric)
  • batting pieces large enough to cover frame insert

  • spool of ribbon(s)

  • glue gun


First off you need to discard the glass and/or any other cardboard that came with the picture. Only keep the outer cardboard that you see when you turn the picture around. Taking the back piece of the frame lay it down on top of a piece of batting. Starting on one side wrap the batting around the board tightly and hot glue into place.


****As you can see I can't Take a picture without my belly getting in the way***


Make a snip in the corners so you can lay them down smoothly. Continue repeating with other three corners and then do it again with the 2nd layer of batting. (I wanted mine to be nice and cushy but you can use less batting if you prefer)


Next you do the same with you piece of fabric. Making sure you pull on it tightly so their are no wrinkles in the front of your board.


For the corners make a snip so you can fold one side over the other.


Now, for the ribbon. I would suggest laying out the pieces first until you get a pattern you like. Then, you place hot glue on the ends of each ribbon pulling them tightly behind the board.


If you want you could use some coordinating fabric to cover the outside of the frame. But, I opted not to because I was tired and I thought it looked fine with the black frame.


Wah-lah, now I have my own version of the cork picture board that cost me hardly anything.


Trust me when I say I have stuff lying around my house I am not joking. You should see my basement where all of my crafting supplies are.


I am trying to finish the girls room. All I need to finish is the fabric self and picture frames for the room then I can concentrate on baby Chum-Chums room. I have less than three months left (I think I need to get started)


Friday, November 12, 2010

DIY Window Valance


I know what you may be thinking......I have to use a power drill, buy lumber, this will be a large project. But, I promise you this was THEE easiest project in the world and IT IS NOT HARD TO DO AT ALL.


Let me show you how I did it.

You are going to need:
Wood, plywood or pressed wood- 3 pieces that meet the measurements of your window, you'll want one long piece to go across the front and then two small pieces that are the same width as your long piece but only 3 to 4" long. They basically need to be long enough to make your valance stick out far enough from the wall for a curtain rod to fit underneath. Mine were 40" x 7" & 4" x 7"

Fabric & Batting- the length of the long piece of wood+side pieces
power drill, staple gun & a level

1st - You need to buy your wood. I know lots of women do not like going to the hardware store, it can be a bit intimidating. But, all you need to do is bring in the measurement for your window and mosie on over to the lumber section. Hopefully, you will be able to find an employee and once you do he can help you pick out the wood. The piece of wood that I got was only $6.28. Once the wood is picked out (wait...the best part of it all) THEY WILL CUT IT FOR YOU IN THE STORE. So that means no sawing for you, unless you are the type that does not mind using a saw.


2nd- Attach the two smaller pieces to each end of the large piece of wood. Use your corner bracket to hold them in place.


3rd- You can start to wrap your batting around the wood. I wrapped mine around twice to give it the extra cushion. Then do the same thing with the fabric. Be sure you pull on the batting and the fabric tightly so their are no wrinkles in the front of the valance.


4th- Use your level to make sure you are hanging your valance straight. Attach your L brackets to the wall first then to your valance. You want to hang it so that it covers the curtain brackets. If you look closely you can see my curtain brackets under there.


Then you are finish. You can rehang you window rod and panels under your new professional looking valance. Trust me this project is easy and cheaper than any new valance you would buy in the stores. I am all about designing on a dime.