
Yes......I am still working on Christina's room. With my luck I will probably finish the day before she is born.
But, I was going back and forth on whether or not I was going to do a traditional mobile that connects to the baby's crib. Or make something myself that shows a bit of creativity and of course me I choose the creativity.
I happened to come across this mobile at Pottery Barn Kids and absolutely fell in LOVE with it. But I was not going to shell out the $59 price tag that was on it. I mean I love PotteryBarn Kids but not that much. I am a secret penny pincher and I couldn't justify it so instead I chose to make it. Here's a quick (ok, not really quick, it's kind of a lot of steps but totally worth it) tutorial so you can make your own.

 and here's Pottery Barn's.....

You'll need:
*1 Wire Wreath Base
*Punches of your choice (mine are the large & small monarch butterfly punch from Martha Stewart)

*Cardstock
*Fishing line (jewelry aisle)
*Pennies
*White spray paint
*Wreath doo-dads for decor (optional)
*Hot glue gun/sticks
1st step is to spray paint your wreath base white. Next start punching away! It's important to use a good cardstock paper (verses printer paper) so your punches will have some durability to them. It's hard to tell how many you'll need so I just punched a whole slew & then as I used them up I would punch more.
To assemble the top of the mobile tie 4 separate strings to the top of the mobile making sure they're evenly spaced apart. The length is really up to you, I cut super long pieces (around 2') at first & then trimmed them down later. Pull the 4 string together & make sure they're even by letting your wreath form dangle, it should hang evenly. If not adjust the strings accordingly. Once you get them right tie them in a knot at the top, then tie a loop with the extra string. This is what your mobile will hang by.
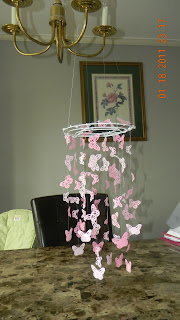
(I temporarily hang mine from my dinning room chandelier because it is easier to string the butterflies when they are higher up)

 I hope you can see it, the light in the room was a little off.
Now time to string some butterflies. Take a 2' piece of line & knot it to the top of the mobile on on the of the rings, string on your butterflies by either weaving the line through the punch-made openings or another technique is same type of process as making a "stop bead" for you beaders out there. Basically, string the butterfly & then thread your line back up through where you came out of, when you tug down on it the butterfly should be secured into place.


 Once you get to the end of your line you need to weigh them down so the string will not curl back up. To do that I traced the circumference of the penny on each color cardstock paper that I used and then cut them out. I attached one circle to each butterfly and used the hot glue to sandwich them together with the penny and the string in the middle.


 I think the finished product looks best if you vary where, how many & what type of punches you use. Also attach your lines to the different wreath rings so some hang a little further back than others.

The last step is optional, I really liked how the one from PBKids had a bit of pink berry looking things at the top. I found some pearl flower decorations at Michaels on sale for $1 (they were trying to get rid of their Christmas flowers).

I also took a few leftover butterfly punches & hot glued them along the top of the mobile, if you bend their wings back a bit they look like they're perched right on top. Super cute in my opinion.

It seems as if Kat always finds a way to get into one of my crafting pictures.

and here is the finished product in the baby's room.


